| Exam Name: | Implementing and Administering Cisco Solutions (200-301 CCNA) v1.1 | ||
| Exam Code: | 200-301 Dumps | ||
| Vendor: | Cisco | Certification: | CCNA |
| Questions: | 1257 Q&A's | Shared By: | riaan |
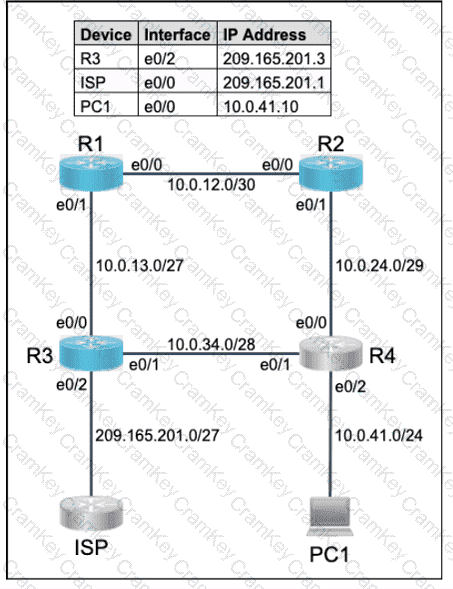
All physical cabling is in place. Router R4 and PCI are fully configured and
inaccessible. R4 ' s WAN interfaces use .4 in the last octet for each subnet.
Configurations should ensure that connectivity is established end-to-end.
1 . Configure static routing to ensure RI prefers the path through R2 to
reach only PCI on R4 ' s LAN
2. Configure static routing that ensures traffic sourced from RI will take
an alternate path through R3 to PCI in the event of an outage along
the primary path
3. Configure default routes on RI and R3 to the Internet using the least number of hops
Guidelines
This is a lab item in which tasks will be performed on virtual devices.
• Refer to the Tasks tab to view the tasks for this lab item.
• Refer to the Topology tab to access the device console(s) and perform the tasks.
• Console access is available for all required devices by clicking the device icon or using
the tab(s) above the console window.
• All necessary preconfigurations have been applied.
• Do not change the enable password or hostname for any device.
• Save your configurations to NVRAM before moving to the next item.
• Click Next at the bottom of the screen to submit this lab and move to the next question.
• When Next is clicked, the lab closes and cannot be reopened.
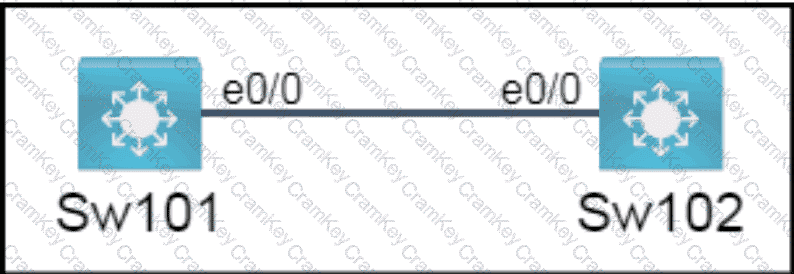
All physical cabling is in place. A company plans to deploy 32 new sites.
The sites will utilize both IPv4 and IPv6 networks.
1 . Subnet 172.25.0.0/16 to meet the subnet requirements and maximize
the number of hosts
Using the second subnet
• Assign the first usable IP address to e0/0 on Sw1O1
• Assign the last usable IP address to e0/0 on Sw102
2. Subnet to meet the subnet requirements and maximize
the number of hosts
c Using the second subnet
• Assign an IPv6 GUA using a unique 64-Bit interface identifier
on e0/0 on Sw101
• Assign an IPv6 GUA using a unique 64-Bit interface identifier
on eO/O on swi02
Guidelines
This is a lab item in which tasks will be performed on virtual devices.
• Refer to the Tasks tab to view the tasks for this lab item.
• Refer to the Topology tab to access the device console(s) and perform the tasks.
• Console access is available for all required devices by clicking the device icon or using
the tab(s) above the console window.
• All necessary preconfigurations have been applied.
• Do not change the enable password or hostname for any device.
• Save your configurations to NVRAM before moving to the next item.
• Click Next at the bottom of the screen to submit this lab and move to the next question.
• When Next is clicked, the lab closes and cannot be reopened.
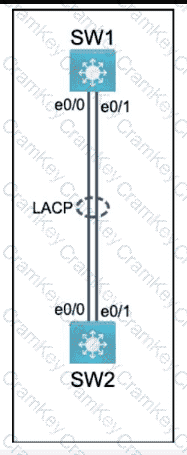
Physical connectivity is implemented between the two Layer 2 switches,
and the network connectivity between them must be configured.
I . Configure an LACP EtherChanneI and number it as 44; configure it
between switches SWI and SW2 using interfaces EthernetO/O and
Ethernet0/1 on both sides. The LACP mode must match on both ends.
2. Configure the EtherChanneI as a trunk link.
3. Configure the trunk link with 802. Iq tags.
4. Configure VLAN ' MONITORING ' as the untagged VLAN of the
EtherChannel.
==================
Guidelines
This is a lab item in which tasks will be performed on virtual devices.
• Refer to the Tasks tab to view the tasks for this lab item.
• Refer to the Topology tab to access the device console(s) and perform the tasks.
• Console access is available for all required devices by clicking the device icon or using
the tab(s) above the console window.
• All necessary preconfigurations have been applied.
• Do not change the enable password or hostname for any device.
• Save your configurations to NVRAM before moving to the next item.
• Click Next at the bottom of the screen to submit this lab and move to the next question.
• When Next is clicked, the lab closes and cannot be reopened.
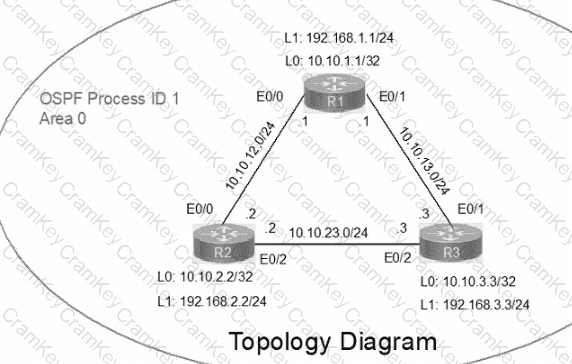
IP connectivity between the three routers is configured. OSPF adjacencies must be established.
1. Configure R1 and R2 Router IDs using the interface IP addresses from the link that is shared between them.
2. Configure the R2 links with a max value facing R1 and R3. R2 must become the DR. R1 and R3 links facing R2 must remain with the default OSPF configuration for DR election. Verify the configuration after clearing the OSPF process.
3. Using a host wildcard mask, configure all three routers to advertise their respective Loopback1 networks.
4. Configure the link between R1 and R3 to disable their ability to add other OSPF routers.

TESTED 26 Sep 2026